HomeA Libertarian Approach to Showerheads: How to Increase Your Flow
A Libertarian Approach to Showerheads: How to Increase Your Flow
Last Updated: April 2014
"If I don't have a good shower, I am not myself. I feel weak and
ineffectual. I'm not Kramer."
- Kramer, in "The Shower Head"
Ever wish you had more shower power? Maybe you fantasize about the
"Stockholm Superstream," or the "Commando 450" (designed for circus elephants!)
from "The Shower Head" episode of Seinfeld. Maybe you the resent the paternalism
and limitations on capitalism that low flow showerheads represent. Or maybe
you just want to get the Federal Government, and the
Green Party
*, out of your bathroom. In any case, if you want a shower-massage-tastic,
firehose-me-like-a-rioter, The-Maid-of-the-Mist-is-off-course-and-has-entered-the-falls,
good-God-Almighty-that’s-some-water-pressure showering experience then read
on.
* Often called "the Watermelon Party" by
Neal Boortz
, since they’re Green on the outside and Red (Communist) on the inside.
First, a disclaimer: I am neither a plumber, nor a lawyer, so consult
one of each before attempting anything described on this page. This page
constitutes neither legal advice, nor plumbing advice, as I am not qualified
to dispense either one.
Required Tools:
A medium-sized crescent wrench
A roll of teflon tape
A screwdriver (probably)
A drill (if you can’t get the specific parts referenced here)
15 minutes to an hour of time, depending on your mechanical inclination.
Legal Ramifications:
With regard to the law, everyone seems to think that it’s illegal
to use pre-ban "assault" showerheads. A quick perusal of plumbing references
online indicate sales and use of such became illegal some time between 1992
and 1995, and threatens dire consequences for plumbers who install such
fixtures. The Seinfeld episode "The Shower Head" portrays a back-alley
"black market" for illegally imported, high flow showerheads.
A trip to the local law library clarifies this somewhat. The Energy
Policy Act of 1992 (citation: Pub.L 102-486) Title I, Section 123, which
went into effect January 1, 1994, says:
"(j) Standards for Showerheads and Faucets. (1) The maximum water
use allowed for any showerhead manufactured after January 1, 1994, is 2.5
gallons per minute when measured at a flowing water pressure of 80 pounds
per square inch..."
This law generally seems to deal with manufacturers engaged in selling
plumbing fixtures. Note that, as a consumer, you are probably neither a
manufacturer, nor are you probably intending to go into the business of selling
showerheads. However, if BATFE firearm regulations are any indication of
how creatively a law can be interpreted at the administrative level, you may be engaged in the act of
"manufacturing a showerhead" by simply modifying an existing showerhead to
have a greater water use or water pressure. So if armed Environmental Protection
Agency agents storm your house,
stomp on your kittens
, and confiscate your plumbing fixtures, you were forewarned. Local laws
also tend to vary quite a bit, so check them too before engaging in any
risky plumbing behavior. Even more locally, if you rent, your lease may
forbid replacing plumbing fixtures without the landlord’s permission.
In light of the described legal obscurity, this page is intended
as a reference for converting plumbing fixtures bought in the US for use
in some less hygienically oppressive sovereign state.
Update: One of our readers (thanks Mike!) brought to our attention that there are sinister forces at work! That's right, the EPA has now targeted the in-wall valves for flow limits. If you're in a very new house or apartment building, or have recently had your shower hardware replaced, you may have one of these restricted-flow valves in your wall. If you need to buy a new valve for any reason, make sure you get one that is switchable! Otherwise, you might be stuck at 2 gpm instead of the higher flow you had before.
We contacted a plumber to learn more. He said that many valves come with a plastic toggle switch that keeps flow from going all the way open. In some cases, you may be able to pop the trim ring off off the shower controls by loosening a set screw, and then get to the little plastic lever to switch it. In other cases, you may need to punch a hole in the wall (if there isn't tile in the way) and switch it that way.
Note that your shower valve may have both a tub output (unrestricted) and a shower output (restricted to 2.5 gpm or less). Some plumbers working with non-switchable valves will mount the new valves in upside-down so the shower is connected to the valve's tub output (a good idea, especially if you haven't got a bathtub). We are still seeking information on how to modify an in-wall valve to overcome flow restrictions. Presumably it is possible, and it's just a matter of figuring out how.
Update: As of 2006, these guys are getting around the law by selling clustered shower heads which collectively, but not individually, exceed the pressure limits. Naturally, government bureaucrats are trying to shut the company down. I have no experience or affiliation with this vendor or its products, but my first impression would be that, if you're just trying to break 2.5 gpm, they are a clunky solution to the problem. However, this might be a great way to get 10 gallons per minute on you without turning your single fixture into a flesh-piercing hydro drill.
Advantages of doing this:
More water pressure = more enjoyable shower. Sadly, when the government set a 2.5 gpm limit on a showerhead, manufacturers went substantially lower than this (say, 2.0 gpm) to avoid any recalls or liablity resulting from variable manufacturing tolerances. This rationale is similar to the one used by shotgun manufacturers who sell their 18"-barreled shotguns with an 18.5" barrel to leave no margin for mistake with regard to the federally-mandated 18" minimum length. It’s funny,
thousands of sites (literally; do a Google
search!) call low flow showers "high efficiency showers." By this rationale,
walking is more efficient than driving, simply because you use less gasoline
in the process. What can we learn from this? What constitutes "efficiency"
is dependent upon one’s agenda!
Faster to warm up. If you have a traditional (tank) water heater, the shower will warm up faster, since you'll more quickly cycle through the cold or room-temperature water than sits between the pipes and the water heater.
Safer. According to a recent study by the University of Cincinnati, the nationwide switch to low-flow showerheads has resulted in higher incident of respiratory illness (from the mist that such showerheads tend to create). The same study found that low flow showerheads are more likely to result in scalding because of the delay between turning up the hot water, and the arrival of that same hot water - lack of immediate feedback makes temperature adjustments difficult.
Disadvantages of doing this:
If you’ve got a small water heater, or a large family,
a higher-flow showerhead may run through all your hot water before you’re
done showering! If this happens, you’ll need to crank up the temperature
on your water heater (legal warning: hot water, like other hot things, can
scald/burn you, just like hot coffee; so if you’re Stella Liebeck, John Edwards, or some other
tort extortionist itching to abuse our broken tort system, you’ve been expressly warned). This will most certainly increase
your gas or electrical consumption, and thus the project may cost you some
money even if you’re using well water. If you’ve got a bigger water heater and/or a small family, this issue may not be a problem for you.
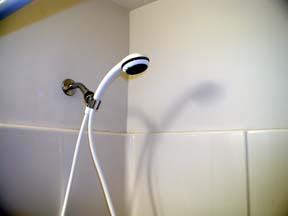
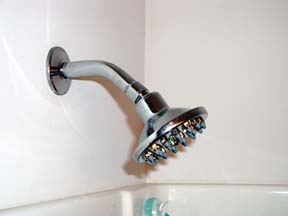
If your shower isn’t tiled to the ceiling (
like this one isn't
), note that the higher water pressure will create additional splashback
when the water hits your head/shoulders. This can cause your walls (and
ceiling, if it’s low) to get more wet than they did before. Keep an eye
on this, and remedy the situation before any drywall gets damaged by water.
You’ll use more water. If you live in a place prone to
drought, it might be unwise to do this. If you’re not "off grid," your water
bill will rise (but maybe with all that fluoride, you won’t even care :)
How to do it:
Our primary goal here is to make available maximal water pressure
(which you can always tune back a bit... see below), using only off-the-shelf
components. Luckily, Home Depot
is there to help us. Update: This company (no affiliation to this site) also makes shower heads with removable flow regulators (a.k.a. restrictors), although I have no experience with them. Update on that update: As of September 2006, this web site seems to be down. It is unclear whether this company was shut down by the feds, or simply went out of business.
If you have a standard, run-of-the-mill shower head:
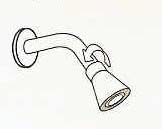
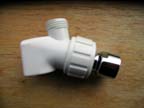
There are a few components you should be familiar with. The
first is the
shower arm joint
. The second is the showerhead itself. Bought randomly off the shelves
of the plumbing aisle, each one of these components may contain its own
flow regulator. Our goal is thus to select a set of parts, each one of
which lacks a flow regulator, or at least has an easily removable
one.
Fortunately, Glacier Bay makes a series of absurdly large showerheads
(the Sunflower
series
), which honestly just wouldn’t work with flow regulators. But the manufacurer
is bound by law to include them. The solution? The easily-accessible regulator
has a hole the exact size and shape of a Phillips screwdriver (coincidence? I think not!):
Just remove the regulator with a Phillips screwdriver prior
to installation. The Sunflower heads are available at Home Depot.
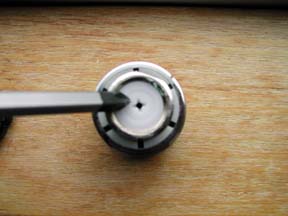
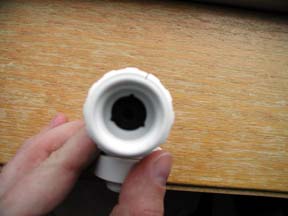
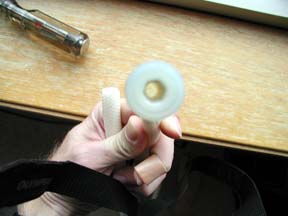
Unfortunately, many other shower fixtures have harder-to-bypass
regulators. Here’s a photo of one that
requires a special three-prong driver to remove
. You could drill it out, but be careful not to drill through the wire
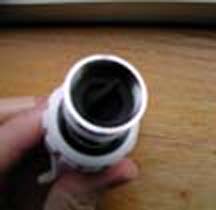
mesh screen that is usually adjacent to the regulator. Melting it out with a cigarette lighter or acetylene torch might be an idea, as it will remove the plastic without harming the wire mesh. In yet other devices,
the wire mesh screen
must be
removed
(usually it has a tab for unscrewing) before the regulator (it's integral
in the latter photo, but is usually a white nylon disc if it's the removable
kind) can be accessed.
Update February 2013: Since so many of the cited Home Depot products have ceased production since this website was created, an update seemed worthwhile. Home Depot's selection now appears smaller and harder to assess the modifiability of, so I paid a visit to an Ace hardware store. Here is a rundown of the models I came across, and the anticipated ease of conversion to high-flow.
The Ace brand "chrome plastic" showerhead (#40076) has a white plastic flow restrictor which is removable with a Philips screwdriver. This is an interesting model in that it simply allows a lot of more water through without a restrictor, as opposed to increasing the force of the cone of water as with many other showerheads. As such, total restrictor removal on the #40076 may be overkill (I found I could wash my hair and rinse it completely in only seconds, and as a result, my now-three minute showers were almost too short!) Drilling the existing hole in the plastic restrictor out to 1/8" or 5/32" diameter (depending on your tastes) and reinstalling the restrictor has been a good compromise. (It looks like Ace's basic plastic showerhead (#45445) has a drillable restrictor, although drilling would probably be a little trickier since it's not screwdriver-removable.)
The LDR Industries Exquisite model has three modes of operation, and what looks like a plastic flow restrictor which does not appear to be removable, but is easily accessible for drilling.
The Whedon Products FP7C and FP4C models seem to have a brass restrictor which is non-removable, but which is easily accessable and drillable. These models have 4 settings. In contrast, the other Whedon models I saw (e.g., the EP24C) looked potentially difficult to modify. Finally, the Whedon FP3C had a brass restrictor which looked easy to drill.
The Oakbrook models seem to have harder-to-drill restrictors, though their lowest-end three-spray setting version (part # 4360988) seems to have easy-to-access plastic flow restrictor which can be drilled. The same goes for the #4360970 model.
The Speakman models (Icon and Hotel) did not look easy to bypass, and are thus not recommended.
All the Delta models I looked at appeared tough to modify. &nbp;However, at least one model (the Delta #75325SN) has the flow restrictor in the extension arm instead of the showerhead itself.
Additional note: In most heads, once you remove/drill out the flow regulator, the critical path becomes the narrow channel through the balljoint. This can be drilled out somewhat, but be careful. You should only expand the hole minimally, and try using the head after each expansion. You can't put back metal once it's gone, and you don't want more pressure than your head (with its tiny holes) can handle. Technically, the holes in the end of the showerhead are the true critical path in the system. You don't want to expand these, because it will dilute the acceleration of the water that occurs when the bottleneck of the tiny holes is encountered. If this doesn't make sense, try running the shower without any head on it; see how little felt pressure-per-square-inch there is? Lots of wasted water without any payoff in showering enjoyment!
Steps:
(Added January 2012) If, and only if, you live in a very new building (less than 5-10 years old, or with a bathroom that was completely renovated in the recent past), it may be wise to first check the water pressure coming out of the rough-in valve (that's the valve inside your bathroom wall that provides water when you turn on the shower). You'll want to make sure you don't have one of the very new, very evil 2.5 gpm rough-in valves, because if the valve inside your wall has a built-in 2.5 gpm restrictor, then no amount of monkeying with your showerhead will increase your flow. The easiest way to check this is to completely unscrew your showerhead from the showerarm using a crescent wrench or channel locks, and set it aside. Then, turn your shower on all the way. Now, time how long it takes the water coming out of the showerarm to fill a 5 gallon bucket or other container with a known size. If it takes two full minutes to fill your 5 gallon bucket, then your flow from the wall is limited to 2.5 gpm (since the measured gallons per minute is 5 gallons divided by 2 minutes), and you'll have to change out your rough-in valve (a job that is rather costly, and beyond the scope of this page) before proceeding. Note: chances are your flow from the wall is not limited, so be ready for a torrent of water to come out and overflow the bucket in short order!
Remove the existing showerhead. Destroy it in some dramatic fashion;
your life of sub-par showers is over! But seriously, use a crescent wrench or pair of smoothjawed channel locks so you don't scratch the finish on the existing showerhead.
Remove the regulators from any necessary components. If you’re using
one of the Glacier Bay Sunflower showerheads described above, only a single
regulator must be removed (although the ball joint may be drilled out for a greater increase in flow). It’s
the first thing you see when looking up into the showerhead feed
. Place a Phillips screwdriver into the plus-sign-shaped hole, and turn
the regulator out counter-clockwise. Keep the regulator; you may want to
modify it as a compromise to achieve less-than-total flow, or if you ever
end up renting out your place.
Wrap the showerarm threads (see diagram) with teflon tape (available
at any hardware store; it’s white, slippery tape that helps seal the junction
and lubricate the threads so that the fixture can be removed again later,
even if oxidation/mineral buildup occurs). Wrap the threads clockwise,
and use a few layers of tape.
Screw the showerhead onto the end of the showerarm, making sure that
any supplied washer is in its proper place (see instructions accompanying
your showerhead.) There will generally be a black, rubber washer in the
junction between the showerhead and the showerarm.
Tighten with a wrench. Be careful not to scratch the finish of your
shiny, new showerhead. Also take care not to overtighten, as this can damage
the threads.
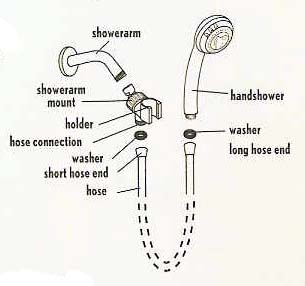
If you have a detached (handshower with hose) shower head:
The process here is very similar to the one for a standard shower
head. You will have an additional component, the hose, to deal with.
Unfortunately, many hoses
have quite a restricted flow
, thus compromising the strong flow you are seeking. And in many cases,
the narrow hose-ends cannot be drilled out without the entire thing coming
apart. See
photo
here; the flanges which keep the threaded nuts on are threaded into the
hose, and attempting to widen the opening destroys the threads. Bad times.
So, you’ll need to put together a handshower kit that lacks
a regulator. This can be tricky, since even components as simple as shower
on-off valves and splitter joints usually come with a narrow regulator channel.
One option is to buy a
Glacier Bay Massage Handshower Set
(Part number 364-449). This comes with a fairly unrestricted hose, and
an unrestricted showerhead. Sadly, the showerarm mount includes an integral
regulator
and aerator
. So throw away the one that comes with it (when you have increased flow,
you won’t need an aerator), and buy a Delta Shower Arm Mount (for handheld
showers), part number #2207. This mount lacks a regulator, thus giving
you all three needed, regulator-free parts. It’s also made of metal, so
it’s less likely to crack than the plastic/PVC mounts. Both the parts described
above are available from your local Home
Depot
.
Steps:
Steps 1 – 4 are the same as with the standard showerhead.
Screw the showerarm mount onto the end of the showerarm. Tighten
with a wrench. Be careful not to scratch the finish of your shiny, new showerarm
joint. Also take care not to overtighten, as this can damage the threads.
Pivot the showerarm mount so that the hose connection is pointing
downward.
Attach one end of the hose to the showerarm mount. Attach the other
end to the showerhead. Generally, no teflon tape is needed here, as the
hose/showerhead threads are plastic.
Make sure no washers fell out as you assembled this. There is generally
a black rubber washer between the showerarm and showerarm mount. There
will also likely be two additional washers, one at each end of the hose.
If the new, uninhibited flow is too much for you, you’ve got
two options.
Replace the flow regulator, but drill it out a bit, first. In the
pictured flow regulator, drill the "plus" shape into a full circle. Reassemble
everything and see how you like it. If it’s not enough, use the next biggest
drill bit to enlarge the hole just a bit more. Remember, drill conservatively;
you can always take the regulator out and drill the hole a little bigger,
but you can’t shrink a hole that’s too big. Nor can you easily buy a replacement
flow regulator at your local hardware store without buying a whole new showerhead!
Go with a wider showerhead. This will distribute the same water
pressure (limited by your pipe diameter) to a wider area, thus yielding
less shower pressure per square inch of your body. The Glacier Bay Sunflower
comes in several sizes. The
4 inch model
(already a fairly large showerhead) gives you more pressure per square
inch than the six inch model. If the six inch model is still too much for
you, there’s actually an eight inch model! The thing is huge; this must
be like bathing in a (fairly gentle) waterfall.
Part availability:
If the parts I’ve listed here aren’t available to you, this is not a problem -- but you’ll need to inspect each component individually prior to purchase.
Bring a small flashlight with you to the hardware store so you can look down into the inlet to determine whether your prospective showerhead or showerarm mount contains a non-removable regulator, or gets narrower in the middle; if it does, toss it back into the bin and try another model. You want a removable regulator; usually, removable regulators are a disc-shaped part which threads into the showerhead or showerarm mount threads and can be removed with a screwdriver or other tool.
If you’ll be needing a hose (for a handshower), visually inspect candidates
using your flashlight, and/or insert a large diameter spike nail to check
if the hose gets more restricted beyond where you can see with your flashlight.
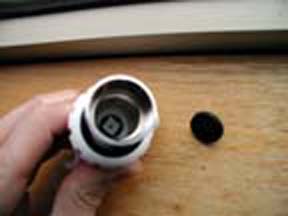
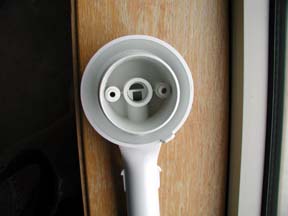
Some showerheads can contain integral flow restrictors which may be difficult or impossible to disable. See example photo of a
Pollenex Massage showerhead
wherein
the regulator is integral with the adjustable shutoff/regulator lever
. See that tiny square hole in the center? That's all the flow you get
on the maximum setting! Short of some precision work with a Dremel, it would
be tough to open this up without destroying the valve, and possibly causing
a leak.
UPDATE: David, one of our readers, reports that as of January, 2007, he was unable to find the Glacier Bay Massage Handshower Set referred to above. However, he reports success with the Waterpik handheld unit (part number B000066PXK)). This model comes with an easily-removable flow regulator, along with instructions on how to remove it. Jay, another reader, suggests the Waterpik 12 Setting Handheld showerhead (NVC-069PP) which has an easily-removable regulator. Thanks guys!
I hope you found this as useful and rewarding as Rufus (a purebred
Bahamian Potcake, in case you were curious -- best dogs in the world!) and I did.
Reminder: All content on this site is automatically copyrighted by virtue of the Berne Convention for the Protection of Literary and Artistic Works. Should you disregard this notice, Rufus the Dog will hunt you down and bite your ass.
